Astronomy vs Astrology is a recording of two voices discussing their thoughts on the cosmos.
This audio track combines the responses from separate interviews of an astronomer and astrologer answering identical questions. Historically, Astronomy (the scientific study of the universe) and Astrology (how the universe affects people i.e. horoscopes) were studied academically as the same practice but have since been disconnected.
This piece explores the relationship between the two fields. The voices seem to have a conversation as they dispute and reconcile their beliefs.
The audio piece was created as a limited edition CD
The back cover outlines instructions on how to listen to the piece
“Play this CD on an audio system with separate left and right speakers if possible. Place speakers on different sides of the room. Eliminate all light sources in order to listen in complete darkness. Lie down facing up in a stargazing position. Closing your eyes is optional.
Play the audio track to meditate, reflect, and contemplate the universe.”
Special Thanks To:
Mike Massa, Judith Sainsbury, & Nathan Saliwonchyk
*the order in which “Astronomy” and “Astrology” appear in the title is meant to be reversible.
Want to learn how to increase your chances of survival when confronted by a wild animal? This post will give you the fundamental insights on how to react properly to your scary beast!
Disclaimer: My name is Andrea and I am by no means on expert on how to handle wild animals. Nor have I ever been in such situations, thus I am not recounting from experience (expect a coyote, which involved squeaking in glee as it ran past into a forest). This post is meant to be an aid for a future emergency. If you plan on confronting a wild animal, DON’T. Or seek professional information.
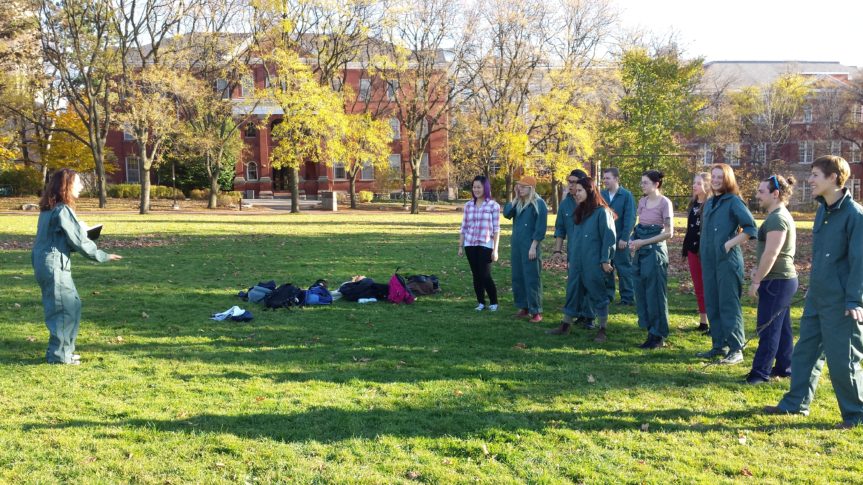
My workshop on Wednesday, November 4th 2015 consisted of a slideshow presentation with information and an activity on Johnston Green.
If you were not present for the introductory presentation, here is a break-down:
Wolf
Wolves are usually extremely shy and will distance themselves from humans at the sight or sound of them. It is very unlikely you will ever be confronted by a healthy wolf.
However, IF you are confronted, do not run. Running may trigger a wolf’s hunting instinct. So:
Do Not Run; First try to back away slowly while facing the wolf, and avoid eye-contact
If it starts to come toward you, make yourself intimidating! You want to remind the wolf that you are scary to them, so wave your arms to appear larger and more intimidating.
Black Bear
Most bears will flee at the known presence of a human, even when startled or caught off guard! However, a habituated black bear (see right) is a black bear who has become used to human contact or even rewarded with food or garbage!
If confronted with a habituated black bear, you should do the following:
slowly and quietly back away from the bear, and move to a safer location in possible
give the bear lots of room to move away on their own
If a black bear is scared of you, it will go into a defensive state. A defensive black bear will see you as a threat and is scared by your presence. It will lower its head and ears, possibly turning sideways in order to appear larger. It may huff or “pop” its teeth (a loud vocal popping sound) and even swat the ground with its front paws. A defensive black bear may also bluff charge, meaning it will pretend to charge at you, but will not actually continue. If confronted by a defensive black bear:
stick in a group while facing the bear in a location that ensures that the bear has a clear escape route – move slowly!
DO NOT turn and run; this may trigger predatory behaviour. Use a low tone of voice so that the bear knows you are aware of its presence, and that you are not a threat.
NOW, what if you get an AGGRESSIVE PREDATORY BLACK BEAR?! A predatory black bear will NOT make any of the defensive actions described above. Instead, it will silently stalk, pressing closer to its prey. If this is the case:
NEVER turn and run – this will instantly cause the bear to chase after you
be aggressive; yell, make loud noises, throw rocks, wave your hands, swipe at the bear with sticks
Grizzly Bear
Grizzly bears are very different from black bears. You might encounter a curious grizzly bear.
Grizzly bears are very intelligent and often curious. They might find themselves exploring near you, because it does not perceive you as a threat. Thus, it is important to remain unthreatening.
When confronted with a curious grizzly bear, the best thing to do is absolutely nothing.
literally just stand there and allow the bear to observe you
do not show fear; you may alert the bear
DO NOT try to move away from the bear; you may incline it to follow you
Your worst case scenario is being confronted by an aggressive grizzly bear. An aggressive grizzly bear will have its ears laid back and will chomp its jaws at you. If this is the case, DO NOT HOLD YOUR GROUND. Holding your ground as you would with a curious grizzly bear may threaten the aggressive grizzly bear and invite a charge. There are two options you can take if the bear decides to charge:
1) Back away while facing the the bear, but without making eye contact. Drop a non-food item between you are the bear; it may stop to investigate.
2)Play dead: drop to the ground belly down and clasp your hands behind your neck. Press your elbows against the ground, spread legs, and use toes in order to avoid being rolled over.
When playing dead, your best chance is to remain completely motionless. If the bear manages to roll you over, continues to roll until you are belly down again.
You must remain that way until the grizzly bear feels that its threat is removed, and leaves you.
TIPS: sometimes the bear just wants you out of the way; make sure you are out of a bears path. You can also use bear spray, but make sure that any wind does not carry it in your eyes. If a bear stands up on its hind paws, it is not showing aggressive behaviour; it is trying to get a better look at you.
Never try to outrun any bear: They are very fast, and will catch up to you.
Do not try to climb a tree to escape a bear: It will catch up to you before you even get high enough, all bears can climb to an extent and drag you down.
Moose
Watching moose from a distance can be fun! But if you are confronted by an agitated moose, it is not comfortable with your presence! Threatened moose may often leave to avoid the threat, but it may in turn threaten to charge you. An anxious or agitated moose will lay its ears back and the hair on the back of its neck and hips may stand up straight. They might also toss their head like a horse, show the whites of their eyes, or smack their lips. These are all warning signs that you are too close and it may charge. To act appropriately:
KEEP YOUR DISTANCE: an aggressive moose wants to drive you off
If it charges, RUN: if possible place obstacles such as trees between you and the moose as you run away. It will stop charging once it has driven you far enough away.
A moose may try to kick you with its front hooves; BUT DON’T STOP RUNNING. If you are on a trail and there is a moose ahead, wait until it moves away; do not try to scare it.
Cougar
First thing’s first; do not wear cat nip if you do not want to be confronted by a cougar. Cougars are predatory animals, and if they see you as prey, that it bad news for you.
Here are some tips in order to lower your chances of being perceived as prey by a cougar:
DO NOT RUN: This will instantly trigger pursuit
make sure you stand and face the cougar, maintaining eye contact. Cougars prefer to ambush their prey from behind, so if it knows you’ve seen it, an attack is less likely
If you are in a group, in order to join closer together, those in behind should move closer up towards people in the front: Never move backward
If the cougar is intensely staring, stalking, or hiding, and is near by, make yourself look bigger; raise your arms, hold up a jacket or backpack over your head
If the cougar still moves towards you, you must be intimidating; those things at it, shout and yell, use any sticks as weapons, and even smile to show your teeth (since a cougar’s weapon is their teeth). You want the cougar to think you are dangerous and NOT prey
ALWAYS fight back (gulp)
The Workshop Activity
After going over all of this life-saving information, I had to make sure that it was engrained into everyone’s minds by having an activity on Johnston Green.
For everyone’s sake, I quickly reviewed what to do in confrontation with each circumstance: Wolf, Habituated Black Bear, Defensive Black Bear, Predatory Black Bear, Curious Grizzly Bear, Aggressive Grizzly Bear, Moose, and Cougar.
We especially had to practice our playing dead technique for confrontations with a charging aggressive grizzly bear:
Also had to go around to make sure that it was difficult to roll people over: Everyone passed.
I obviously had to act out some defensive actions that wild animals may show
(Ears laid back is a common one)
Everyone running away from an agitated moose:
Thank-you so much wild-lifers for your amazing participation!!
Many thanks to my photographers: Alaina Osborne and Nathan 🙂
For more on wild animal confrontation reactions, see:
“DON’T GET EATEN: The Dangers of Animals That Charge or Attack” by Dave Smith
Remember:
Never approach, feed, or follow wild
Conflict with wildlife are primarily caused by inappropriate human behaviour
Lack of warning signs are NOT an invitation for you to approach a wild animal
After spotting some caterpillars on a birch tree, Nina thought that a pair of them would make a perfect moustache. Using honey to help encourage the caterpillars to stop crawling up her nose and stay on her upper lip, she photographed her new look. Crossdressing, an act that is generally thought of as a highly unnatural act, transpires here using entirely natural materials
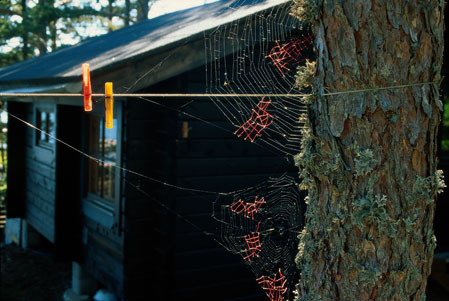
Mended Spiderweb Series
Nina searched in the forest for broken spider webs which she mended with red sewing thread. These repairing patches were made by inserting segments of the thread one at a time directly onto the web. Smaller threads were held together by the web itself whereas larger pieces were assisted with white glue.
Nina often found that in the process, she would accidentally cause more damage to the web. Then later, the spider would reject her repaired patch and replace it with its own web again, leaving the red thread to fall on the floor.
Nina also thought that she would take the opportunity to teach the spiders how to advertise:
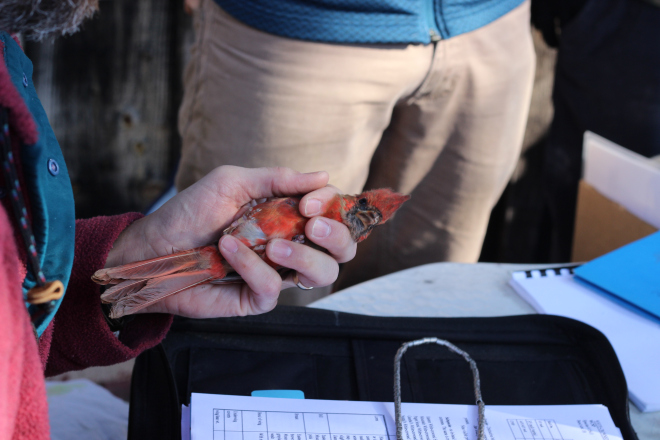
Bird Banding is the practice of capturing birds in order to attach bands to their legs for identification purposes, recording data, and then releasing the bird back to the wild.
On Thursday October 8th, I had the privilege of joining Chris Earley and the Lab Studies in Ornithology class for a morning of bird banding! The first thing I got to see was Chris surrounded by ornithology students as he pulled birds out of small, cloth bags for data collection. For each one, he identified (if possible) and recorded the date, the bird’s ID, specie, sex, age, weight, and fat level, as well as any unusual characteristics.
Before you get ahead of yourself, you must record the identification numbers and letters if the bird is a re-capture and give it a new one if it does not have one already. These are read from a silver aluminium band. The date and time of capture must also be recorded. You also must initial your name, so that people know who made a mistake (probably YOU).
In order to band a bird, you must first measure it’s leg size. Chris has a handy dandy measuring device to help him give the bird the right sized band so that it is not too tight, nor too loose. You don’t want it to hurt the bird, but you also don’t want it too fall right off!
Bird banding pliers are used to open the band enough to attach around the leg, and then tightened shut.
Here, Chris is banding a White Throated Sparrow, who has a cute little white patch under his “chin” and a yellow mark between his eye and beak. This bird can have either brown, grey-brown, or red-brown eyes. This species has a light band above the eye which is either white or tan coloured, the white band being more dominant.
The Chickadees, which are a resident bird here at the Arboretum get coloured bands in order for easy identification through binoculars. On this occasion, we skipped identifying the bird’s sex and fat level because you cannot tell what sex a chickadee is unless they are breeding, and the fat level is skipped because they live here and are sufficiently fed (they don’t have to store fat for later!)
This beautiful Chickadee gets some lovely bright coloured bands. The pattern or combination of the bands are marked down on record, reading from top left to bottom right (by left, Chris means the bird’s right leg, so that when it’s standing facing you on a branch, you read it like a book).This may vary depending on the the place it is banded.
Keeping track of all these Chickadees is useful for knowing how old some of them are, which is often difficult to tell. The oldest Chickadee at the Arboretum is at least 7 years old, which is fantastic for a bird that has an average life expectancy of less than 2 years.
Sometimes you can tell how old a bird is by subtle differences in colour or feather quality. Above, Chris is looking at the tail feathers of the White Throated Sparrow to see if they are abraded or not. So, if they look scruffy we can guess the bird’s hatch year: the age of the bird based on the year they were hatched. Another example is in the Hermit Thrush, who’s hatch year is based on plumage:
The wing chord is usually measured to determine if the bird is male or female. For White Throated Sparrows, a wing chord or 60mm or fewer is a female, and 74mm or greater is male.
Here, the wing chord of a Mourning Dove is measured in order to determine it’s sex. However, if this measurement isn’t outside of the unknown interval, Mourning Doves who are male have more blue coloured feathers on their head. (This one is female!)
Look how big it is compared to the tiny Red Breasted Nut Hatch. *simultaneous aww*
Next, in order to check the birds Fat Level, you must blow on the birds chest, belly, and under his wing to see the amount of fat it has – then he gets a number according to a fat level chart.
Here, the lovely Mourning Dove we saw earlier looks slightly embarrassingly at the camera as Chris checks how fat she is:
Finally, the birds are put back into their cloth bags in order to properly weigh them on a digital scale.
Then, they are released! I got to hold and release a White Throated Sparrow, making me the happiest ornithologist ever.
To release the bird, you hold it in one hand using what is called a Bander’s Grip. The other hand is held flat underneath the bird’s feet (NOT shown above…) so that the bird can stand on your hand, then you let go of the bird with your first hand and voila, the bird takes off faster than lightning and flies away.
There are two common ways to hold a bird:
The first is called Bander’s Grip, where two fingers are positioned on either side on it’s head, not too tight, but tightly enough so that the tips of your fingers are close to touch. The bird rests belly up in the palm of your hand, excellent for identification and comfortable handling.
The second is called Photographer’s Grip, where three fingers are used to hold his legs and feet. This is useful to get a beautiful photo of you and your bird as it sits up naturally (shown below). Below is a beautiful Dark Eyed Junco who’s colour ranges from dark grey to black and who’s eye colour varies from redish brown to dark red.
Just when you think you’ve gotten through all the birds, you’re happily mistaken. You go on a couple net runs to check if more birds have been caught in the Mist Net. These are long nets made up of very light, fine mesh that pockets birds that fly into it.
The birds kind of just hang out there until somebody comes to free them, which, depending on how tangled up the bird got, may take quite a while. Although it’s funny when just as your trying to help them out of their tangled mess, they start to chirp at you and move around more! This Ruby Crowned Kinglet awaits assistance. Only males have the red crown, so this one is female!
Not sure if this Hermit Thrush is screaming help me, or don’t help me….
When you untangle a bird, you carefully place it into a cloth pouch using a bander’s grip, then carefully sliding your hand out so that the bird does not find it’s way out following your arm. You then wrap the tie around once, through the loop, and secure.
This takes a lot of concentration and great care to make sure you don’t hurt the bird. Sometimes the bird will get itself caught in many layers of the mesh, just like this Chickadee did.
Just for fun, some ornithologists are holding up bird seed to see if any will land on their hand….none did.
Overall, it was a fantastic morning, even though I had to sprint to my class right after. If you are interested in birds (which you should be), Chris Earley may still be doing weekly bird banding. The Wildlife Club also has bird watching in the morning at the Arboretum, who you can e-mail at wildlife@uoguelph.ca
Sorry for the long post, here is a confused Northern Cardinal:
Our second “Reading Outside” performance took place in the greenhouses attached to the Bovey building on campus. During this reading-out-loud event, we covered topics of the usefulness and uselessness of nature and art.
We started by reading an article titled Useless Creatures by Richard Conniff, an opinion writer and published author. He professed the idea that wildlife should not have its valued measured by its usefulness to humans, but marvelled for its beautiful uselessness.
We also read an excerpt from Mishkos Kenomagwen: The Teachings of Grass, a narration about the struggles of making the relationship between Sweetgrass and basket makers’ harvesting known to the science world. This in contrast to the article emphasized the usefulness of the grass. But more importantly, it stressed how the relationship between humans and our environment can actually help it flourish.
Even though we were not technically outside, being surrounded by a vast variety of plants and the sound of trickling water made us feel close to nature any how.
In light of our recent trip and the fact that the e-mail list on courselink doesn’t have everybody on it (since we’re separated into two sections), I decided to make a quick post about making your pictures biggerwithout making them all blurry. I know Diane said to stretch them, but that makes the quality horrible for some reason, even if your original picture was big and pretty before :O. So in case you didn’t know, there is an option to choose the size of your photo.
When adding media, it uploads it to a media library then you pick the photos you just uploaded, right? Well on the right side there are “attachment details” which may seem useless, I know, BUT, if you scroll down to the bottom of that little thing, you get options for the size! It usually picks thumbnail right off the bat for you, but if you just press Full Size, you should be able to get it as big as it will appear on the blog 🙂 Then you can just make it smaller if you like (or click the “small” or “medium” option)
Above is what you’re looking for, then just insert into post as usual 🙂 and it’s pretty!
Anyways, I will totally delete this post later, but I thought it might be helpful with all the beautiful photos that will be coming in from everyone on our trip! Okay, that is all 🙂
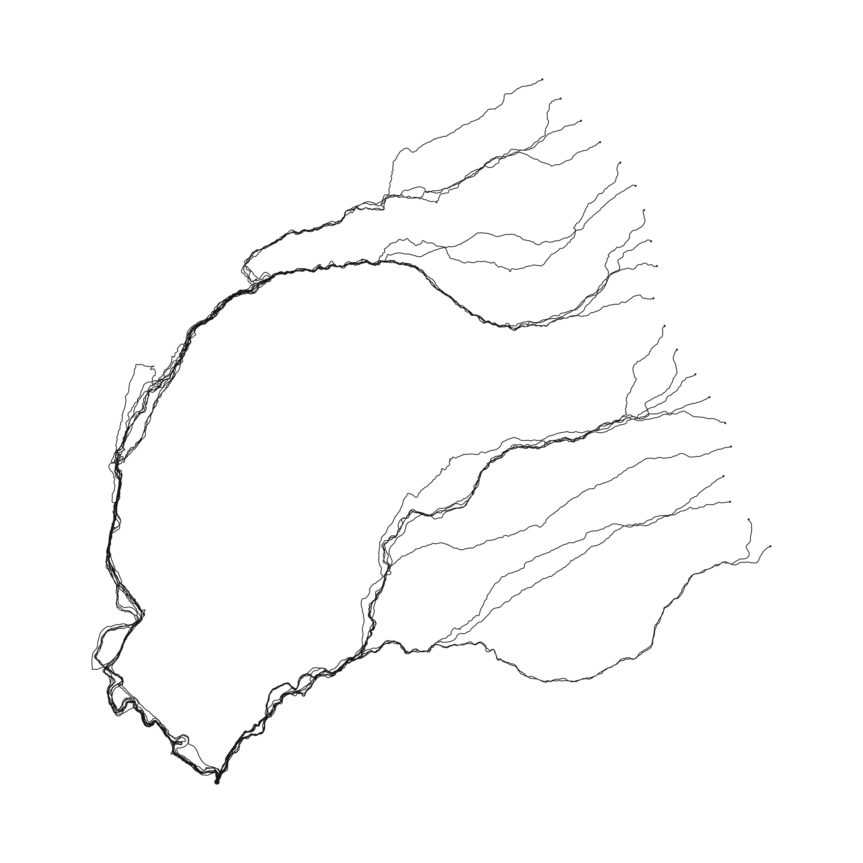
Similar to his Wanderlust Windwalks in 2007, Tim Knowles created a Waterwalk called Path of Least Resistance in 2013. When Tim Knowles was asked by VARC to lead a walk as a part of Art-Walking, he decided to let the walk be determined by the path of least resistance, where the participants would walk as if they were running water, following the shape of the landscape as gravity led them downhill towards an endpoint.
Each participant departed from different starting points along the valley’s watershed, evenly spaced apart, marked by numbered flags. Each walker took their own diverse paths until they eventually joined in similar folds of the landscape, following the stream downhill until they reached the endpoint. Each individual carried a GPS tracker in their backpack that logged their path.
This data was used to create this drawing of the built up tracks, revealing the nature of the landscape. For Tim Knowles, this not only describes the form of the land, but records the action of walking downstream.
As a response, Tim Knowles decided to participate in the same action. In his walk, he noticed evidence of the walkers travelling through the area. He photographed all these instances to make his photo series called Track #1. These photos include bent grass, broken branches, footprints in the mud, depressed moss and more. Combined, these images create a sequence marking the journey made.
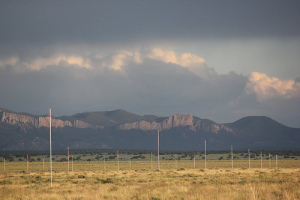
The Lightning Field is a long term installation made by Walter de Maria in the desserts of western New Mexico in 1977. The installation is made up of 400 polished stainless steel poles each standing 20 ft and 7 inches (6.27 meters) tall, and about 2 inches (5.1 cm) in diameter. The poles are positioned in a grid-like manner, each 220 ft (67 m) apart from the other.
Although this installation attracts lightning, experiencing this work of Land Art does not depend on its occurrence. The Lightning Field is intended to be experienced over an extended period of time. For this reason, Walter de Maria offers the opportunity to rent an overnight cabin which can accommodate up to 6 guests during the months May – October.
If you’re interested in experiencing this amazing work, here is a link to the Visitor Information page on the Dia Art Foundation website (they commissioned this piece): http://www.diaart.org/sites/page/56/1301
and it’s cheaper for students 😉
Panoramic video of The Lightning Field because its difficult to find a video because copyright


You must be logged in to post a comment.